Installation
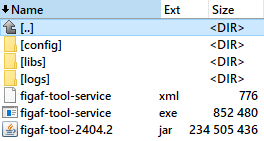
Here you can find an example of the structure that you need to have to run the Figaf Tool application.
This is just an example and you need to put your own values if you have another jar version, DB credentials, etc.
There are two ways of how to run/install Figaf Tool on Windows: a bat file or a Windows service.
There are also two ways of how to run/install Figaf Tool on Linux: a sh file or a Linux systemd service.
Commons steps
There are a couple of common steps in all cases:
1. Create a folder for your installation.
4. Create a config/application.yml.

spring:
profiles:
active: production
irt:
db:
type: postgresql
host: localhost
port: 5432
username:
figaf
password:
<db password>
name: irt
server:
port: 8089
#uncomment for getting more detailed logs
#logging:
# level:
# com.figaf: DEBUG
5. logs folder will be created automatically.
Postgresql installation on windows.
To install and configure Postgresql . Download the latest version. Version we currently recommend Version 14, but we should also support never versions
1. Download the latest version .
2. Default installation. Remember to make sure you have enough space on the disk and preferably not use boot disk. Remember the password you have created
3. Current installer ask for staring Stack Builder. Just skip this.
4. Open the pgAdmin application and login with the password you have added
5. Navigate to Login/Groups
6. Select Create Login/Group Role
name: figaf
on Definition tab - password: yourpassword form config yml file
on Priviliges tab - Can login shold be enabled
press save
7. Navigate to Databases
8. Create Database enter "irt" and select the figaf user. Then press save
9. In the databases navigate to irt and expand
10. Navigate to schema
11. Create Schema "irt" and assign figaf as user. Press Save.
12. You can now start the Figaf Tool.
Windows installation details
1. Windows .bat file
Folder structure:
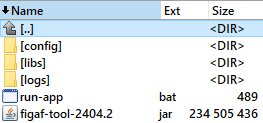
run-app.bat:
java -Xmx4096m -Dloader.path="./libs" -Djavax.net.ssl.trustStoreType=Windows-ROOT --add-modules=java.se --add-exports=java.base/jdk.internal.ref=ALL-UNNAMED --add-opens=java.base/java.lang=ALL-UNNAMED --add-opens=java.base/java.nio=ALL-UNNAMED --add-opens=java.base/sun.nio.ch=ALL-UNNAMED --add-opens=java.management/sun.management=ALL-UNNAMED --add-opens=jdk.management/com.sun.management.internal=ALL-UNNAMED --add-opens=java.base/java.util=ALL-UNNAMED -jar figaf-tool-2404.2.jar
pause
If you just need to run the tool without installation as a windows service, then just execute "run-app.bat" file.
2. Windows Service
We recommend using a Windows Service Wrapper:
https://github.com/winsw/winsw.
Folder structure:
1. Download exe file from the GitHub releases
page. Usually it's either "WinSW.NET4.exe" if you have .NET Framework 4.0 installed or just use self-contained "WinSW-x64.exe".
2. Rename it to figaf-tool-service.exe
3. Create a figaf-tool-service.xml:
<?xml version="1.0" encoding="UTF-8"?>
<service>
<id>figaf-tool</id>
<name>Figaf Tool</name>
<description>Figaf Tool Windows Service</description>
<executable>
<your path to JDK/JRE 17>\bin\java</executable>
<arguments>-Xmx4096m -Dloader.path="./libs" -Djavax.net.ssl.trustStoreType=Windows-ROOT --add-modules=java.se --add-exports=java.base/jdk.internal.ref=ALL-UNNAMED --add-opens=java.base/java.lang=ALL-UNNAMED --add-opens=java.base/java.nio=ALL-UNNAMED --add-opens=java.base/sun.nio.ch=ALL-UNNAMED --add-opens=java.management/sun.management=ALL-UNNAMED --add-opens=jdk.management/com.sun.management.internal=ALL-UNNAMED --add-opens=java.base/java.util=ALL-UNNAMED -jar figaf-tool-2404.2.jar</arguments>
<logmode>rotate</logmode>
</service>
4. Open the command line.
5. Run "figaf-tool-service.exe install".
6. Run "figaf-tool-service.exe start".
Linux installation
You can run Figaf Tool on Linux using
.sh file described below in section 2. It will run the tool in the context of your current session.
For full standalone installation as a systemd service do all steps below.
For full standalone installation as a systemd service do all steps below.
1. User access configuration
The best practice is to create a separate user that will only own the Figaf Tool installation folder and will be used in the
systemd service descriptor (see section 3 below) to run the tool.
The following commands show how to configure separate user figafToolRunner and group figafToolManager to restrict access properly (you should run them as root, login with 'sudo su -'):
The following commands show how to configure separate user figafToolRunner and group figafToolManager to restrict access properly (you should run them as root, login with 'sudo su -'):
- # create user figafToolRunner
useradd -m figafToolRunner - # define password for figafToolRunner
passwd figafToolRunner - # create group figafToolManager
groupadd figafToolManager - # add group figafToolManager to the user figafToolRunner
usermod -GfigafToolManager figafToolRunner - # add group figafToolManager to your user to be able to browse/edit content in the Figaf Tool installation folder
usermod -GfigafToolManager <your user> - # change ownership for all files inside installation folder to the user figafToolRunner
chown -R figafToolRunner /var/opt/figaf-tool - # change owner's group for all files inside installation folder to the group figafToolManager
chgrp -R figafToolManager /var/opt/figaf-tool - # grant full access for owner and users that have owner's group
chmod -R ug+rwx /var/opt/figaf-tool - # remove access for other users
chmod -R o-rwx /var/opt/figaf-tool

All new files uploaded to the installation folder must have
rwx permissions for the owner's group if these files will be used by the tool in runtime
As an alternative, if you already have a user that should be used in the
systemd service descriptor (see section 3 below) to run the tool, just grant permissions to Figaf Tool installation folder (for example
/var/opt/figaf-tool).
You can use the following commands (you should run them as root, login with 'sudo su -'):
- # change ownership to specified user
chown -R <required user> /var/opt/figaf-tool - # grant full access for owner and users that have owner's group
chmod -R ug+rwx /var/opt/figaf-tool - # remove access for other users
chmod -R o-rwx /var/opt/figaf-tool
It will change the ownership of the folder and enable full access to the owner and owner's group.
2. Linux .sh file
Create
run-app.sh file in the Figaf Tool installation folder (for example
/var/opt/figaf-tool/run-app.sh
):
java -Xmx4096m -Dloader.path="./libs" --add-modules=java.se --add-exports=java.base/jdk.internal.ref=ALL-UNNAMED --add-opens=java.base/java.lang=ALL-UNNAMED --add-opens=java.base/java.nio=ALL-UNNAMED --add-opens=java.base/sun.nio.ch=ALL-UNNAMED --add-opens=java.management/sun.management=ALL-UNNAMED --add-opens=jdk.management/com.sun.management.internal=ALL-UNNAMED --add-opens=java.base/java.util=ALL-UNNAMED -jar figaf-tool-2404.2.jar
Folder structure is the same as in the Windows example.
This file should be open for execution by user who is configured in systemd service descriptor ( see section 3 below). If user is configured in the way described above, grant ug+rwx access to it:
This file should be open for execution by user who is configured in systemd service descriptor ( see section 3 below). If user is configured in the way described above, grant ug+rwx access to it:
- chmod ug+rwx run-app.sh
If you just need to run the tool without installation as a
systemd service, then just execute run-app.sh file.
3. Linux systemd service
1. Configure run-app.sh file as it is described in the previous section.
2. Create a service definition under the root access:
/etc/systemd/system/figaf-app.service.
<user that should run the tool> here is either figafToolRunner from the example in the configuration section or your another user.
<user that should run the tool> here is either figafToolRunner from the example in the configuration section or your another user.
[Unit]Description=Figaf Tool Service
[Service]
User=<user that should run the tool>
#change this to your workspace
WorkingDirectory=/var/opt/figaf-tool
ExecStart=/bin/bash /var/opt/figaf-tool/run-app.sh
SuccessExitStatus=143
TimeoutStopSec=10
Restart=on-failure
RestartSec=5
[Install]
WantedBy=multi-user.target
3. Enable the service and start it
(you should run them as root, login with 'sudo su -'):
- systemctl enable figaf-tool.service
- systemctl daemon-reload
- systemctl start figaf-tool
After completing any of these configurations, go to
http://localhost:8089 and start using the Figaf Tool.
You can get a license key by registering at
figaf.com/devops
Goto Configuration -> License and insert your license key.
Next up you can configure your agents.
Related Articles
Onboarding/Installation (Figaf DevOps Suite - Cloud Version)
In this mission you will see how to connect to your SAP Cloud Integration system. 1) Open the email you have received 2) Click on the link to open the page and enter a new password 3) Now you are in the Figaf Tool The screen may change a little ...Requirement before installation
We recommend the following prerequisites Registration for a trial at figaf.com/devops so you will get a license key Download the Figaf runtime jar file at irt.figaf.com/download. Have a server/laptop with 8Gb of memory. Figaf can run on a laptop but ...Start here to install the Figaf Tool
If you are looking to run Figaf there is a number of ways. Where The Figaf Tool is a standalone Java application that makes it easy to run in several different locations. We support Java 21. It's enough to use OpenJDK 21, normally recommend ...Installing Figaf DevOps Suite on your PC
Installing Figaf DevOps Suite on your PC In this section tutorial, we show how to install Figaf DevOps Suite on your PC for a PoC. Mac would be much the same except the script should be a little different command to start the tool with. Requirements ...Deploy to SAP BTP, Cloud Foundry
This article describes how to deploy the Figaf tool to CPI BTP, Cloud Foundry. Before you get started you need to have a Cloud Foundry subaccount with PostgreSQL and Cloud Foundry Runtime enabled. Read more here how to get Setting up SAP BTP Account ...